
Assembly
Welcome to Resident!
If your kit includes a practice whale, follow the videos below. If you are building the holiday ornaments, scroll down and look for the video titled Build Diamond Ornament.
Welcome to Resident! Want to learn more about how these are assembled or starting on your kit? See the videos below for all the practice you need to have fun building one of our DIY paper sculptures.
Want to print out your own practice whale to follow along? You can do that by downloading here.
Folding the Practice Whale
Gluing the Practice Whale
Starting on the big sculpture
If you want to read more and see pictures, they are all listed below! If you have any questions now or while you're assembly, reach out through the contact form above or the email listed on the instruction card in your kit.
Building the Diamond Ornament
Folding
Every piece is already scored along the fold lines. If you have a digital download that you've printed out, you'll need to score all of the fold lines with an empty ball-point pen, the back of an exacto knife, or any other dull edge on the side that you printed on. All the folds are marked by a line comprised of dots or dashes.

The dotted lines you'll fold away from you once.

The dashes lines are folded twice. First away from you and then back. This makes a really nice outside edge for the finished product.

First out (as seen above) and then folded back (as seen below)


All the folds will work the same way on all the pieces! Just remember - dots fold once, dashes fold twice.
Gluing
You'll get a small bottle of glue with the kit. Take a push pin and make a small hole in the top of the bottle. This will give you a lot of control over how much glue you use. If you need to order more glue, the same type that's in the little bottles is Aleene's Quick Dry Tacky Glue.

The glue will always go on the side without anything printed on it. You won't need much and it's best to put it right in the middle of the tab (instead of really high or low).


If you get any glue on your fingers, it easily rubs off. It won't wash off with water. I usually rub the part of my hand with glue on it against my other hands palm, then wipe my hand on my jeans or a rag to get the dried glue bits off before touching the paper again. Keep your hands clean! Anything on your fingers could be transferred to the paper. Since it is paper, make sure your hands are dry before you start building!
I recommend keeping the red cap on the bottle at all times (except when you are actively using it). This will prevent it from drying over the small hole. If that does happen, just use a push pin again in the same hole to open it up.
Building
Start with piece # 1 and piece #2 (the big number in the middle). Fold all the scored edges on both pieces. You'll glue those two together by lining up the sides that match. The tab on one piece will glue to the other one. Once you've done all the ones that match up, bring in the next piece and continue until you are done!
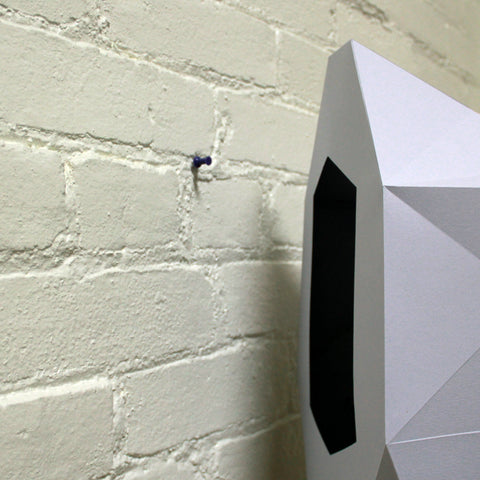
How to Hang
Just use a push pin! The finished models are hollow and super light since they are paper. The back piece has an opening that will sit on the push pin (or small nail if you're so inclined).
Moose Support Piece
Leonard the Moose comes with a support piece between the two antlers on the inside to prevent the head being squeezed from the weight of the two antlers. See the photo below for how to install it correctly. It installed with the top parts protruding into the antlers and then the notch sitting right at the bottom edge of the antlers on each side.
